how to put on a halloween wig step by step guide to a secure natural fit with easy pro tips
Practical stepwise guidance for a secure, natural Halloween wig fit
Quick overview: why a correct fit matters and what this page covers
If you've ever wondered "how to put on a halloween wig" so it looks natural, stays put through a party or convention, and feels comfortable all evening, this long-form guide was written for you. Below you'll find a checklist of materials, a clear step-by-step process, pro tips for a realistic hairline, troubleshooting methods for slipping wigs, maintenance advice, and optional quick styling tricks. This article emphasizes practical techniques and safety, and repeats the core phrase how to put on a halloween wig in context so searchers and readers find the most relevant, actionable advice.
What you'll need before you begin
- Wig (lace front, full cap, or wefted) in the style and color you want.
- Wig cap(s) — nylon or mesh, one or two depending on hair volume.
- Comb or brush designed for wigs (wide-tooth or soft-bristle).
- Hairpins, bobby pins, and optionally wig clips/sew-in clips.
- Scissors (for trimming lace), small mirror, and a second mirror for the back if possible.
- Optional adhesives: wig tape, wig glue/adhesive, or adhesive-free grip products.
- Setting spray or lightweight hairspray and a little foundation or concealer that matches your skin tone for blending a lace front.
- Elastic band or wig grip headband for extra security when needed.
Quick safety and comfort notes
Always test adhesive on a small piece of skin first to check for allergy or irritation. If you feel any discomfort, itching, or redness, stop and rinse the area. Use breathable caps and avoid adhesives for very sensitive scalps. When using heat to style synthetic wigs, verify the manufacturer's heat tolerance; many synthetic fibers will melt under a hair dryer or straightener set too hot.
Preparation: prepping hair and the scalp
- Secure your natural hair. If you have long hair, braid it or flatten it into a low bun; use multiple flat braids or a wrapped low bun to create an even base. For very thick or textured hair, a silk or satin scarf wrapped around the flattened hair can help reduce bulk.
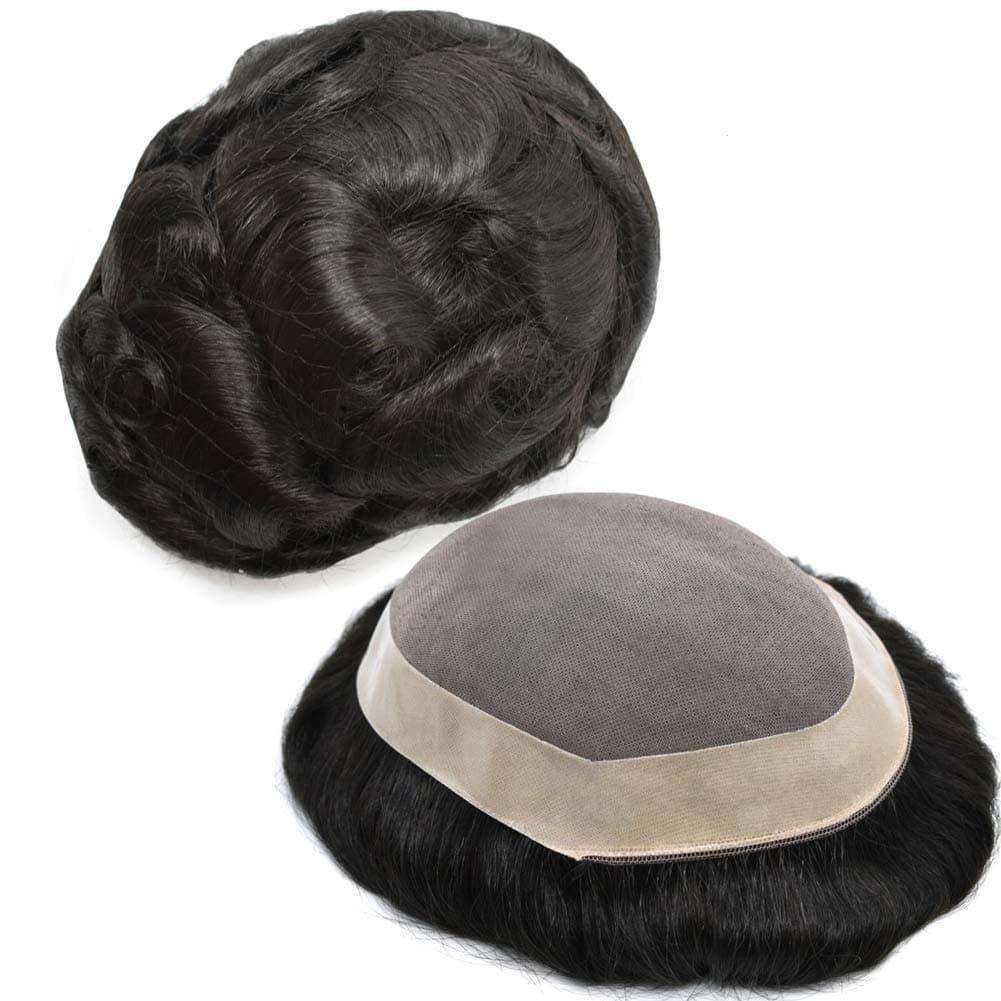
- Put on a wig cap. Choose a cap color that closely matches your skin or the wig cap color. Pull the cap down so your hairline is gently covered; tuck any stray hairs under the cap. For how to put on a halloween wig with a lace front, place the cap about an inch behind your natural hairline so you can adjust the lace later.
- Trim and clean. Remove any lint or excess hairs from the inside of the wig and brush out tangles. If the wig has a long lace front, trim excess lace carefully with sharp scissors parallel to the hairline—cut small sections at a time to avoid removing too much.
Step-by-step application: a dependable routine
- Inspect and orient the wig. Locate the front lace (if lace front) and ear tabs; align the wig so the parting and hair direction match your intended style. This is the moment to decide whether you'll change the part or keep the factory part.
- Position the wig on your head. With both hands holding the wig at the temples, tilt your chin slightly forward and slide the wig on from front to back or back to front, depending on design. Many find sliding from the back toward the forehead ensures the nape fits snugly. Adjust the ear tabs so they sit comfortably over each ear, then align the front lace with your natural hairline.
- Secure temporary grip points. Use wig clips or bobby pins at the temples and nape for instant hold. Insert pins through the wig cap into your hair (or wig cap) at about a 45-degree angle to minimize slippage. If your wig has adjustable straps inside, tighten them until the wig feels snug but not painful.
- Blend the hairline for a natural finish. For lace fronts, apply a small amount of skin-safe adhesive to the hairline or on the lace, press the lace gently into place, and allow it to set. Alternatively, lay a thin line of wig tape along the temple points. Use concealer or foundation on the lace or along the part to minimize sheen and make the hair appear to grow from your scalp. For quick temporary setups, a simple wig grip band under the wig will prevent shifting without any glue.
- Set the style and check security. Once in place, gently comb the wig to settle the fibers. Use a light hairspray or setting spray suitable for synthetic or human-hair wigs. If you expect lots of movement, sew a small elastic strap inside from ear to ear under the wig's crown for long-term secure wear—this is a popular pro tip for dancers and performers.
Advice for lace-fronts and cutting lace safely
When trimming lace, cut close but not all the way to the hairline; leave a small amount of lace to avoid cutting individual strands. Work in daylight or bright, diffuse lighting for accurate, even trimming. If you're unsure, ask a friend or stylist to help. Many DIY situations benefit from cutting lace in a curved, staggered pattern rather than a straight line to mimic a realistic hairline.
How to make a wig look more natural
- Pluck the hairline sparingly. For wigs with dense factory hairlines, gently pluck a few strands to create a slightly sparser, more realistic edge. Use tweezers and be conservative—less is more.
- Use baby hairs or short strands. Pull out a few hairs at the temple or forehead and trim them to a short length to create delicate baby hairs. Lay them with a tiny amount of gel or edge control for realism.
- Color-correct the lace and part. Lightly apply foundation or powder to the lace and root area so the base matches your skin. For darker skin tones, use a darker concealer rather than white powder to avoid a visible line.
Securing for activities and all-night comfort
For active events where you'll dance or move a lot, combine methods: wig tape at the temples, a small dab of adhesive at the front center, and an adjustable strap or sew-in elastic at the nape ensure extra security. If you plan to sleep with a wig (not generally recommended), remove adhesives and use a satin bonnet to protect the fibers rather than keeping the wig glued on.
Common mistakes and how to avoid them
- Using too much adhesive. This creates a noticeable ridge and can damage lace—use minimal product and only as much as needed for hold.
- Not flattening natural hair. Bulky hair under the cap results in a lumpy shape; use thin caps and braids to keep volume down.
- Neglecting part style. A stiff factory part can reveal a wig's origins—loosen and style the part to look more natural and less perfect.
Special tips by wig type
For synthetic wigs
Synthetic wigs are low-maintenance but heat-sensitive. Use cool water and wig shampoo, never hot water, and reshape with cool settings. If you need to restyle, use products specifically made for synthetic hair. To make synthetic hair look natural, remove shine with a small amount of dry shampoo or baby powder applied lightly at the roots.
For human-hair wigs
Human-hair wigs allow heat styling and offer a superior natural look. Treat them like natural hair: use sulfate-free shampoos, gentle conditioners, and occasional deep conditioning. To maintain the hairline, avoid heavy adhesives that could pull on the delicate base.
Advanced tips for professionals and enthusiasts
- Bleaching knots on lace fronts. For the most natural look, skilled users bleach the knots to reduce the appearance of tiny dark dots where strands are tied into the lace. This requires care to avoid damaging hair fibers.
- Customization by sewing in layers. If you have a permanent or semi-permanent installation, a stylist may sew the wig onto a braided foundation for stability; this is common for theatrical or long-term wear.
- Use wig combs strategically. Sew-in or clip-in combs can be placed under the cap for anchor points; combine these with pins for optimal hold.
Styling shortcuts for quick transformations
If you need a fast transformation, start with a cap and a polished lace-front wig, add a little contouring along the temple and forehead, and create baby hairs. Use a curling iron or flat iron (if allowed) to add movement, and finish with a lightweight hairspray for longevity. These simple changes can increase perceived naturalness quickly.
Troubleshooting: problems and fixes
- Wig feels too loose. Tighten inside straps, add an elastic band, or sew a sweatband-style elastic across the interior to hug the scalp.
- Hairline looks fake. Pluck, add baby hairs, or use concealer and powder to match skin tone and reduce contrast.
- Wig lifts at temples. Apply small adhesive tabs at the temple junctures and secure with pins for double support.
- Itchy scalp under cap. Try a softer cap material, wash the cap regularly, or use a thin layer of barrier cream before applying the cap—avoid sticky adhesives against irritated skin.
Maintenance and longevity
Store wigs on a stand away from sunlight and heat. Wash gently based on fiber type: cold water and gentle wig shampoo for synthetic, lukewarm water and conditioner for human hair. Avoid rough drying; blot excess water with a towel and air dry on a wig stand to keep the cap shape intact. Rotate wigs if you have multiple to reduce wear and tear on a single piece.
Cost-saving DIY approaches vs. professional help
DIY trimming of lace and minor plucking can save money, but for major customizations like bleaching knots or re-lining the cap, seek a professional. A stylist's experience avoids irreversible errors and can often achieve a more natural hairline in less time.
Concise checklist: before you walk out the door
- Wig cap securely in place and all hair tucked.
- Lace trimmed and blended or taped/adhesive applied if needed.
- Wig adjusted with straps, pins, or elastic for snug fit.
- Baby hairs and hairline blended with makeup.
- Final check with mirror: part, direction, and nape alignment correct.
When practicing how to put on a halloween wig, aim to do a full test run a day ahead of your event. That extra time helps you identify pressure points and adjust adhesives or straps for the longest comfortable wear.
Pro checklist for an extra-secure, natural finish
- Wear a thin silicone grip or velvet wig band for non-adhesive security.
- Add two small clear tape tabs at the temples for instant hold.
- Sew a removable elastic strap from ear to ear inside the wig for longer events.
- Use a small makeup brush to add skin-toned powder along the part and hairline.
Final reminder: practice and patience make a huge difference. The more you experiment safely with different methods—cap types, adhesives, baby hair creation—the better you'll become at achieving a natural, secure look.
FAQ
- Q: How long should I let wig adhesive set before styling?
- A: Most skin-safe wig adhesives need a few minutes to become tacky; wait until it's tacky but not wet, usually 2–5 minutes, then press the lace into place. Follow product instructions precisely.
- Q: Can I sleep with my Halloween wig on?
- A: It's not recommended to sleep with adhesives in place; if you must nap, remove adhesive and wrap hair in a satin bonnet to reduce tangles and stress on the fibers.
- Q: How do I prevent friction and wind from displacing my wig?
- A: Use a combination of methods—tape or thin adhesive at key points, a sewn elastic strap inside, and bobby pins at the temples—and consider a temporary scarf or headband if you expect heavy wind.
By combining these steps—preparation, correct cap and hair flattening, careful lace trimming, strategic use of adhesives and pins, and subtle cosmetic blending—you can reliably master how to put on a halloween wig for a convincing, comfortable, and secure look that will last all night.
Related products
Blog
- How to Snag the Best Wig Sale Deals Save Big and Find Your Perfect Wig Sale Style
- wiggy wigs Buying Guide 2025 Top Styles Care Tips and Best Places to Shop
- is ralph macchio wearing a wig A Closer Look at the Evidence Photos and Hairline Changes
- why did lyle menendez wear wigs - exploring the motives, courtroom strategy, and public reaction
- how to make your own wigs - step-by-step DIY guide for beginners with budget supplies and styling tips
- How Long Does a Wig Last on Your Head - Realistic Lifespan, Maintenance Tips and When to Replace
- Does Trump Wear a Wig? Stylist Experts, Photo Analysis, and the Viral Rumors Explained
- How to Detangle a Synthetic Wig with Fabric Softener - Gentle Step by Step Method to Remove Tangles and Restore Shine